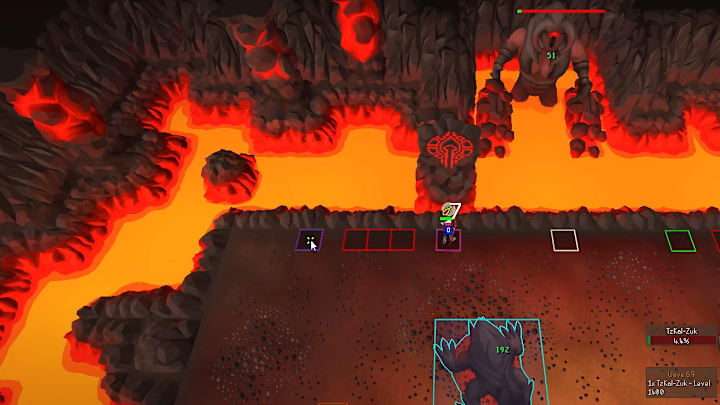
Even as the years have gone by, and more and more high-level PvM content has been added to Old School RuneScape (OSRS), completing the Inferno, which was released in June 2017, remains one of the toughest and most rewarding challenges in the game.
Simply getting through the first 66 waves is a major challenge in and of itself, given the difficulty presented by some of the difficult combinations of opponents. Dealing with a Mager, Ranger, Meleer, Blob, and two Bats on Wave 62 is what I personally consider to be the toughest task en route to simply getting to Jad on Wave 67.
And then, of course, on Wave 67 against a single Jad, and on Wave 68 against three Jads at once, the big battle is you against your nerves. A single mistake, and there goes two (or more) hours of quality gameplay that led you to that point. I'll say what many have said before me, however: if you can beat one Jad, you can beat three.
And if you can beat three, the ultimate challenge awaits on Wave 69: TzKal-Zuk.
The level-1,400 Zuk presents a unique encounter that is more about strategy than it is about brute force. There are multiple phases to the fight, including the first phase in which he simply spawns a Mager and a Ranger set every three and a half minutes.
That timer pauses once 600 of his 1,200 lifepoints are gone but resumes once he dips under 480 lifepoints and spawns a Jad, so you’ll need to take care of the Jad quickly to avoid absolute chaos with a Jad, a Mager, and a Ranger attacking you all at once.
And during it all, you absolutely must remain behind the shield, which is actually relatively straightforward if you take advantage of the standard safespots and only leave those safespots once Zuk has started his attack motion, which is when he moves his right leg forward.
That timer continues throughout the rest of the fight, so you’ll want to be strategic about when you spawn the Healers, which happens after Zuk dips below 240 lifepoints, since you also don’t want to be dealing with a Mager and Ranger set while the Healers are still alive and flinging lava at you.
When the Healers spawn, Zuk immediately goes into enrage phase, though if you are Blowpipe-walking (“Woox-walking”) the healers, by running two tiles on one tick and attacking on the next, the whole way up and down the line, stopping only at the corners during the shield’s pause, this should keep you perfectly hidden behind the shield.
Then comes the pure enrage phase.
During this phase, you’ll probably have to deal with another Mager and Ranger set at some point before the fight is complete.
What differentiates the enrage phase from the non-enrage phase is the fact that Zuk attacks quicker, rendering the standard safespots useless if you start moving whenever Zuk initiates an attack.
But what many guides won’t tell you is that, yes, the safespots you use during the non-enrage phase also 100% work during the enrage phase, if you use them carefully.
To do so, you will also need to use the middle safespot, which is a sort of “take it or leave it” safespot in the non-enrage portion of the fight.
This safespot is five tiles away from the left and right middle safespots, which is one tile less than the gap between the two safespots on the left and the two on the right, but with this strategy, that single-tile difference doesn’t matter.
So you should mark five safespots. From each side, there is one four tiles away from the edge, and one six tiles away from that. In the center of the middle two is the absolute midpoint safespot.
With a long-range weapon such as a Twisted Bow or a Bow of Faerdhinen (BowFa), you can attack Zuk from any one of those safespots. The key is to move to the next safespot whenever the marking – at the center – of the Ancestral Glyph (the shield) is precisely perpendicular to where you are standing.
You can give yourself even more pinpoint accuracy by marking the Glyph with the shift-click “tag” option.
No, you can’t run to the next safespot every time Zuk initiates an attack, or you will be hit by a Zuk attack (and presumably die with two attacks at the most). But you can still reliably move from one safespot to the next in a very consistent manner if you move only when the midway point of the Glyph is lined up with your true tile.
At that point, all you need to do is treat the enrage phase like the opening phase of the fight. By dealing with the standard Mager and Ranger sets and simply being slightly more careful on your safespots, you can experience the feeling of watching Zuk’s health bar reach 0 and claim an Infernal Cape.
